7/02/2011

Malifaux- Swamp Bases

I've been meaning to take some time and learn how to make some swampish bases based on this tutorial that I found on Terrain Thralls.
If you ever want to learn to make a good swamp base, check that site out. They are amazing.

I also asked my friend over on Grim Dark South for some advice on his Dark Eldar bases. I'm sure if he ever updates that blog of his, you'd be able to see how good his bases are.
Then I spent a good 3 days preparing myself. Having never created bases by hand except for a couple really bad (in hindsight) gravel bases, I was extremely nervous. I would hate to ruin my gremlins by creating monstrosities to pin them on.

It is a lot of pictures so I'll ask for your forgiveness in advance.

 Remember, I followed the tutorial I found pretty much word for word. I'm not going to explain it very much because the author did a much better job than I ever could.
Biggest thing I work on in the beginning was cutting out the water portions and sealing the bottoms with sheet styrene and making sure to glue the rocks down before tossing the sand on top.

 A few of the water sections, space permitting, I tossed in a few bits and pieces I had left over from various sources. Just to spice things up a bit.
The barrel is tossed upside down, like it was spilled in by accident.

Various body parts are chopped up zombie bits from GamesWorkshop.
 Be careful if you cut out portions to create space for water effects. If you don't create a perfect seal and partition off exactly where you want the water to go, it'll either require a lot more than you want to use or it will spill out everywhere.


 For the first base coat of paint, I had to really water down my browns. The sand and rocks had a lot of little crevasses that just didn't seem to want to take in paint.
It took forever to dry and several of them required a second coat.
I'm very very impatient.

 Poor zombies, I never did get to use you like I wanted...Until now! Mwahaha!  The only good zombie is a dismembered and mutilated one.


I painted the bottoms of all my water bases dark green and swirled a little blue to give it some color.  I may have used a bit too much blue and didn't thin out the paint enough. Rather than a swampish feel, it's a bit brighter than I'd like.
Still looks good though. Very pretty.


Most of my finished water bases before any other additions.
I did my best to change up the look and size of the water portions, but there is only so much room on a 30mm base.
They turned out better than I thought they would though.


After about 4 layers of dry brushed browns, from darkest to brightest, I was finally ready to glue the grass on. Note for the future, white glue dries INCREDIBLY slow and if you plan on doing these, don't do them one at a time.
I had a dead brown grass and a lively green one that I mixed together and it creates a much more realistic looking patches. Beware of the fact that the crap gets everywhere and sticks to everything. Don't sneeze!


Close up of the large pig base. I tried to glue grass in small patches and even went "off base" in several of them. It's supposed to give it a larger than life feel, as if it belongs to a bigger picture, rather than confined to a small 30mm piece of plastic.
Does it work? I'm not sure, I'm not the best person to ask, but it still looks good, so it doesn't hurt to do it.


I started adding some tall grass that I got at Hobby Lobby. Woodland scenics makes some great terrain flock, trees, and grasses. For about 4 dollars, I have enough long grass to create a life time of bases. I did up 43 bases and barely touched the amount I bought. Less than 5% is a conservative guess.
The bridges are made from balsa wood and plastic strips. Be careful with balsa wood if you work with it. Very flimsy and doesn't take kindly to having any sort of force applied to it.


When you glue the grass down, watch out, it tends to lean or spread out before you are ready for it.  It takes some getting used to, but you should be able to get it to stablize itself and let it dry without any babysitting.
Cutting the grass is easy, getting it to look naturally grown and not perfectly landscaped is not.


Eventually these are going to be my mosquito bases. I haven't touched them yet as I'm still not sure what to paint them, but the signs should be a good place to pin them.
I just need to remember that Balsa wood is terrible at pinning without being stupidly careful.
I foresee ruined signs and lots of cussing in the future.


I used a Micros Pen to write the words. I tried to paint them on, but I couldn't keep the letters roughly the same size and I kept spacing them too far apart.
This way, my bad handwritting can be passed off as bad gremlin english.


Finally finished them all in about 3 days. I think it was roughly 5 hours a day after work. I'm glad my wife tolerates my bad husbanding as I ignore my family for hours at a time as I obsess over my project.
She's the best.

15 hours of work for 43 bases.  Not too bad I guess. I think I could go faster now, but it would shave off that much time.


I was in a rush to play a game of Malifaux, so I forgot to take a picture of my finished water bases. Here's a base with my 2nd Warpig.
I didn't use modelling water effects, but some cheap stuff I found in the plant display isle at Wal-Mart.
It's basically clear resin that I pre-mix and pour carefully.  It takes up to 48 hours to dry and is extremely cheap. $7 dollars for a massive amount.


The downside is that if you glue any grass where the water will touch as you are pouring it in, it will soak into the grass, pool where you don't want it to be and spill out all over your desk. I had to chip about 10 bases free and refill spots where the resin literally climbed up and out of the base.

See the grass on the bottom? It was meant to be dry. It doesn't look bad, in fact it's great because it gives it a nice wet look that swamp area should have. It was just unintentional and made an impossible to clean up mess.

The total cost of creating all these bases, not including the time required was probably about $25.  I had to buy sand, pebbles, various grasses and the water effects. I didn't even come close to using up any of my materials, so technically if you ignored start up costs, I used pennies worth of materials.


6/21/2011

Random Thoughts

I was working on creating a new set of bases for my Gremlins. The process involves a lot of sand and rocks, that once glued down, I drybrush 4-5 different colors of paint to give it a nice, realistic look.

Then it hit me. I am painting over real rocks with several layers of paint, so that it will look realistic. It's a process that takes a fair chuck of time, to make it look real when it was real to begin with.
We do the same with metal bits such as suits of armor or iron tubing. I will prime an armored knight white/black and slowly work my way up to the silver the model started out as.

I know, it wouldn't really work out if we just left it, as is, and it's a lot easier to age or modify the color if it's primed to begin with.  It just struck me as funny that some days it seems like I take a lot of steps forward just to go backwards.

6/14/2011

Kingdom Death 2

Finally finished putting together all three models. They weren't as bad as I had assumed they would be. I decided to give them a quick black wash to shade all the details, but unfortunately it didn't turn out nearly as well as I had hoped.
Thank God I'm just going to prime them white and start painting them for real in a little bit.


I'll start with the pinup White Speaker as she was the easiest. She started off as three basic pieces and one of them was the cloak that I decided to ditch.
I'm not a big fan of fur cloaks and it almost looked silly on her.
She was the easiest to clean up as she only had a minor mold line along the outside of her legs and one arm.


I managed to pin her arm holding the knife in place and was thrilled at how easy it was.  I love working with resin models, especially after working with a lot of tough, heavy duty metal models, resin is almost effortless to drill.
The resin used in all the models is very...springy. It's strong but it has a lot of give to it. The only thing I can describe it with is a piece of wood that's still very fresh and green. It will bend pretty far without breaking till it hits a snapping point.


The pinup Forsaker was the 2nd one to get cleaned up. She was a tougher job. There were a few mold lines very close to the chains she has everywhere, so it was a bit hard to tell what was a mold line and what was actual detail.
Sorry about the splotchy wash. The wash didn't want to stick to parts of the model. I think it's from an improper cleaning on my part and I hope it doesn't cause my primer to flake off like a bad sunburn.


Remember what I said about snapping point? Her sword hilt used to have a manacle hanging down. I was in the process of turning her over and it got caught on my nail and suddenly it was gone.
Better broken now than after it is painted.
This model had a bubble in the ankle joint where the foot attaches. It's not too bad, but it's enough that you can see the pin I placed in it. Some green stuff should take care of it though.


Last is the pinup Preacher and her miniscule fingers.
First, her fingers hardly gave me any trouble, the worst part was figuring out a way to hold it steady enough to glue to her wrist.
Why didn't they just model it onto her hand?
Second, this model had more bubbles in her cast than the other two combined. They were very small, about .05mm, but enough to be noticed. One bubble killed the spike on her hammer.


Third, the hammer handle is VERY flexible. I accidentally bent it while trying to avoid the grasping hands of my curious daughter and it didn't snap or even feel weak afterwards.
Even with the bubbles, her quality is great. Against my better judgement, I may have to use her in games, just to see her in action.


I'm not sure when I will attempt to paint them since I'd like to finish up my Gremlin crew and attempt to work on some bases to go with them. Perhaps my next post will be my failures and successes at Swamp basing?

6/06/2011

Kingdom Death

Apologies all around for not messing with my blog these past few months, I've been equal parts busy and lazy.

I'm a big fan of alternate models for any game system I dabble in. Doesn't matter how amazing the real models are, there is just something about having models that are different from everyone else's that I enjoy. Enter Kingdom Death, maker of highly detailed, wild, creepy and sexy miniatures.
Look through their site and marvel at their line of mini's, especially The Wet NurseGrand Mother, and The Gorm.

After drooling for months I gave in and got the three models that kept grabbing my eye. The Pinup Preacher, Pinup White Speaker, and Pinup Forsaker.  It was going to be for my Slaanesh army I swear!
 It would have been four, but sadly I missed the re-release of the Wet Nurse by minutes.

First thing I noticed when I opened the box with trembling, excited hands were these awesome concept art prints. They aren't very big, maybe a bit bigger than a postcard, but they are printed on thick cardstock and the color printing is great.


Next were the boxes themselves. You can tell that the Forsaker Pinup is an older miniature because the box is missing the nice little print of what goes inside. The quality of the boxes are very nice though the printed picture isn't all that great. The ink bled together a bit and the details aren't that sharp, but its good enough to tell what you are looking at.
The dime in the picture is there for size comparisons. Most of my family don't realize how small a miniature can be, so this should help them.


Up first is the Forsaker.  She was my favorite for a long time, ever since I started looking for a Khorne Herald to be used in my Daemon's army.

This box was packed with stuffing to protect the model. It comes with a little thank you card and invites me to show off my work, which is nice.
Everything is separated into small plastic bags and it comes with a non-descript resin base.


The quality is amazing. I haven't seen any bubbles, almost non-existant mold lines, and virtually no flash. Clean up on this model is going to be easy as cake. Even the head , with all it's tiny details is 90% perfect as is.


The bad part is everything is that pinning this model is pretty much impossible for me. I'm not sure I have a pin small enough to pin together her miniscule wrists.


Also resin models being what they are, I'm not sure I can use this model to play games with. I can see those horns snapping at a careless grab.
Repairing that would be a lost cause.


Next up is the Pin Up White Speaker. Apparently this was a re-release to celebrate their new equipment and software. With the new gear, Kingdom Death is now able to release models with even finer detail and less mistakes.
I'm not sure if this is their latest model, but it seems that way.


The White Speaker is pretty much one piece. Not fuss over pinning several joints, but also almost no chance of modifying the pose or weapon. I personally will be keeping it as is, but just a heads up to everyone else, the pose is going to be static.


Again there are no bubbles, almost no flash, and I'm not sure I could find mold lines on this model.  The fur cloak looks great and her details are very sharp. I expected something to be wrong with her jewelry or straps but they all seem to be fine.

I'm thinking about using her as a Zoraida proxy for Malifaux. She seems to have a slight voodoo feel right? :)


Finally comes my new favorite model from Kingdom Death. I say this now, before I even attempt to put her together.
She comes with an alternate head so I can choose to have her look like a librarian or not.


She also comes with two right hands. I can only assume it's because they know you are going to destroy the first one in your attempt to put her together. Look at how tiny they are.
The letters on the dime, the smallest coin the United States has, is larger than the biggest finger of that hand.
Scared doesn't even begin to cover what I feel just thinking about using her in a game.


The Preacher has been chopped to pieces. This will help with getting her to be posed differently, but it is going to make putting her together a pain in the ass. Pinning is out of the question, so I can only hope my superglue is up to the job.
Her hammer's handle is also pretty flimsy. I may have to try and replace it with a brass rod, though I'm not sure how my chances of that are.


Again the model, clean up wise, is virtually perfect. Almost no flash, no imperfections, and no mold lines that I can see.
Painting her is going to be a real treat, though I'll be practicing flesh tones on other models before I tackle her. I want this to be a showcase model rather than above average table top quality.


Overall, I love these mini's. The quality is top-notch and the details are astounding.
I want to stress that these are not suited for gaming unless you are extremely careful, which is disappointing. These seem to be made as showcase models, though how that fits in with Kingdom Death's own game-in-the-works eludes me.
Gluing them together looks to be a hassle, but at least cleanup will be a breeze. I will be posting new pictures once I get around to setting them up.
The boxes and concept art are great. I wish most models were packaged this way.

3/09/2011

Malifaux- Piglets

Heh, I didn't realize that before these Gremlins, I hadn't painted a Malifaux model in close to 3 months. Good lord how fast time goes by when work tries to throttle the life out of you.
Luckily for me these little guys were a breeze to paint.
I'm slowly working my way down the list of Gremlins to paint and I'm leaning heavily towards a pig-centric list. Something about bouncing pigs back and throwing the odd explosive swine that just makes me giggle inside.


I followed the same basic steps that I took for the piglets larger kin. Blood red base coat, light black wash to darken the recesses, and highlighted with a brighter red to help make the muscles pop out a bit.
Mane is basically black with a light grey dry brush to help you see the various strands of hair.
Teeth, hooves, and horns are just white with a splash of Gryffon Sepia to make them seem more yellowed and dirty.


The idea of bomb pigs is hilarious. It's the whole reason for a very pig heavy list. I'm not sure how well it's going to work, but it should be a fun game at the very least.
Painted the dynamite sticks an orange with yellow stripes at the tips to help them be more noticeable against the dark red skin. I love the classic ACME bombs and everything, I just wish they would have created new models rather than reusing the classic piglets with bombs modeled on top.


This was going to say BOOM but I greatly underestimated how hard it is to paint words that are less than a millimeter high.
I think I may be getting better at painting wood. At least I did a better job with the highlights on the boxes than I usually do.


It may be hard to see, but I attempted painting fire for the first time on the lit fuse. It is very similar to trying to paint lava.
I made the mistake of painting the fire in reverse and starred at it for nearly 15 min before I realized why it looked so bizarre. I knew I had the correct colors down before I realized that the order it was in showed the fire starting from the top going down into the fuse.

2/25/2011

Malifaux- Gremlin Crew

Woo, sorry for the lack of new content. Lots of new life situations popped up and hobby time = zero. Sacrificing sleep for an hour here and there was really the best I could do to sneak in some painting time.

I finally managed to finish painting up the Som'er crew that I won as a prize from The Gamer's Lounge ages ago.
Living in Arkansas for a few years gave me plenty of time to see what a real redneck looks like. Denim is everywhere along with worn out leather jackets, stained wife beater t-shirts, and lots of guns.
The Gremlins are PERFECT.


I decided to go with a brighter green rather than the usual dark orcish green I see everywhere. I seem to paint lots of dark colors and with the Gremlins I had a chance to go for a brighter, sillier scheme.
To break up all the green, I gave them all yellowish liver spots. The spots are actually very small, barely noticeable from three feet away, but up close, they help give some character to the crew.


I really dislike the Som'er model. The face just doesn't do anything for me. Once the hats and guns pack arrives from Wyrd, I may attempt to convert a regular gremlin into one carrying a massive rifle and wearing a giant hat, one that is obviously too big for his tiny head.
I need to work on wood grain effects and changing up leather. They are coming way too similar for my tastes.


I had so much fun painting up the crew that I went ahead and bought pretty much the remaining models to complete my collection. I need 2 more Giant Mosquitoes, the Pig-a-pult model when it is finally released, and possibly another Giant Warpig.
I did my best to model the generic gremlins into different poses or holding different gear, but I can only do so much with solid metal sculpts.
Anyone have ideas for the 3 gremlins holding the rifle in the shooting position? I hate the pose and the fact I have 4 of them irritates me.

1/22/2011

WH 40k- Tyranids- Warrior Prime

I wish I had enough time in the day to spend time with all my hobbies. These last few weeks, rather than completing one of my many projects, I've been spending every non-working minute playing Persona 4.
Luckily for me, I've finally completed the game, which only took me 70+ hours of game time. BTW, amazing game. Check it out. It's worth it.

Now that I've taken care of that particular hobby time killer, I've been messing around trying to finish converting my Warrior Prime. The goal of my Tyranid army is to have a primarily Warrior based/evolved force. This means Warrior Primes as the HQ, Warriors as the troops, Shrikes/Ravenors as fast attacks and a brood of Lictors tossed in for the elites.
Of course having nothing but warrior based bugs won't help me trash vehicles so eventually I plan on throwing in Zoanthropes, hiveguard, Trygons, or Tyrannofexes. It may not be the most competitive army, but I'm hoping it'll look freaking awesome.

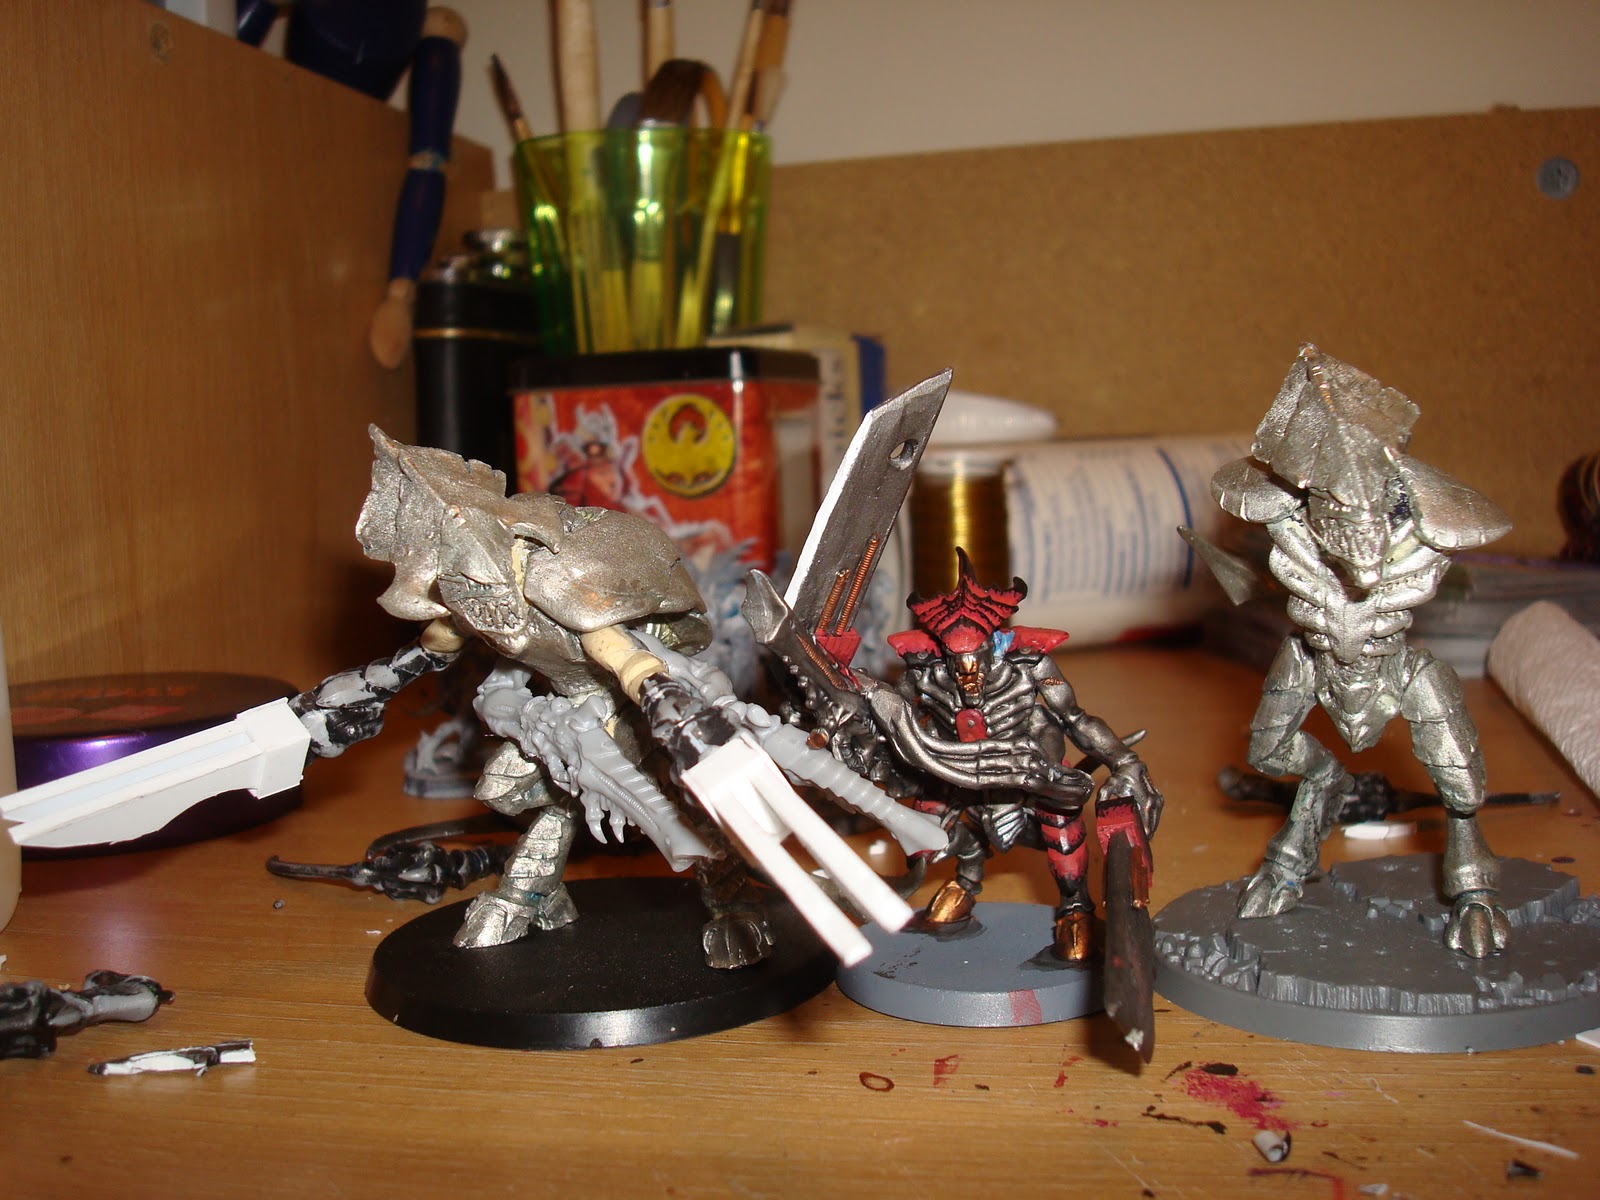
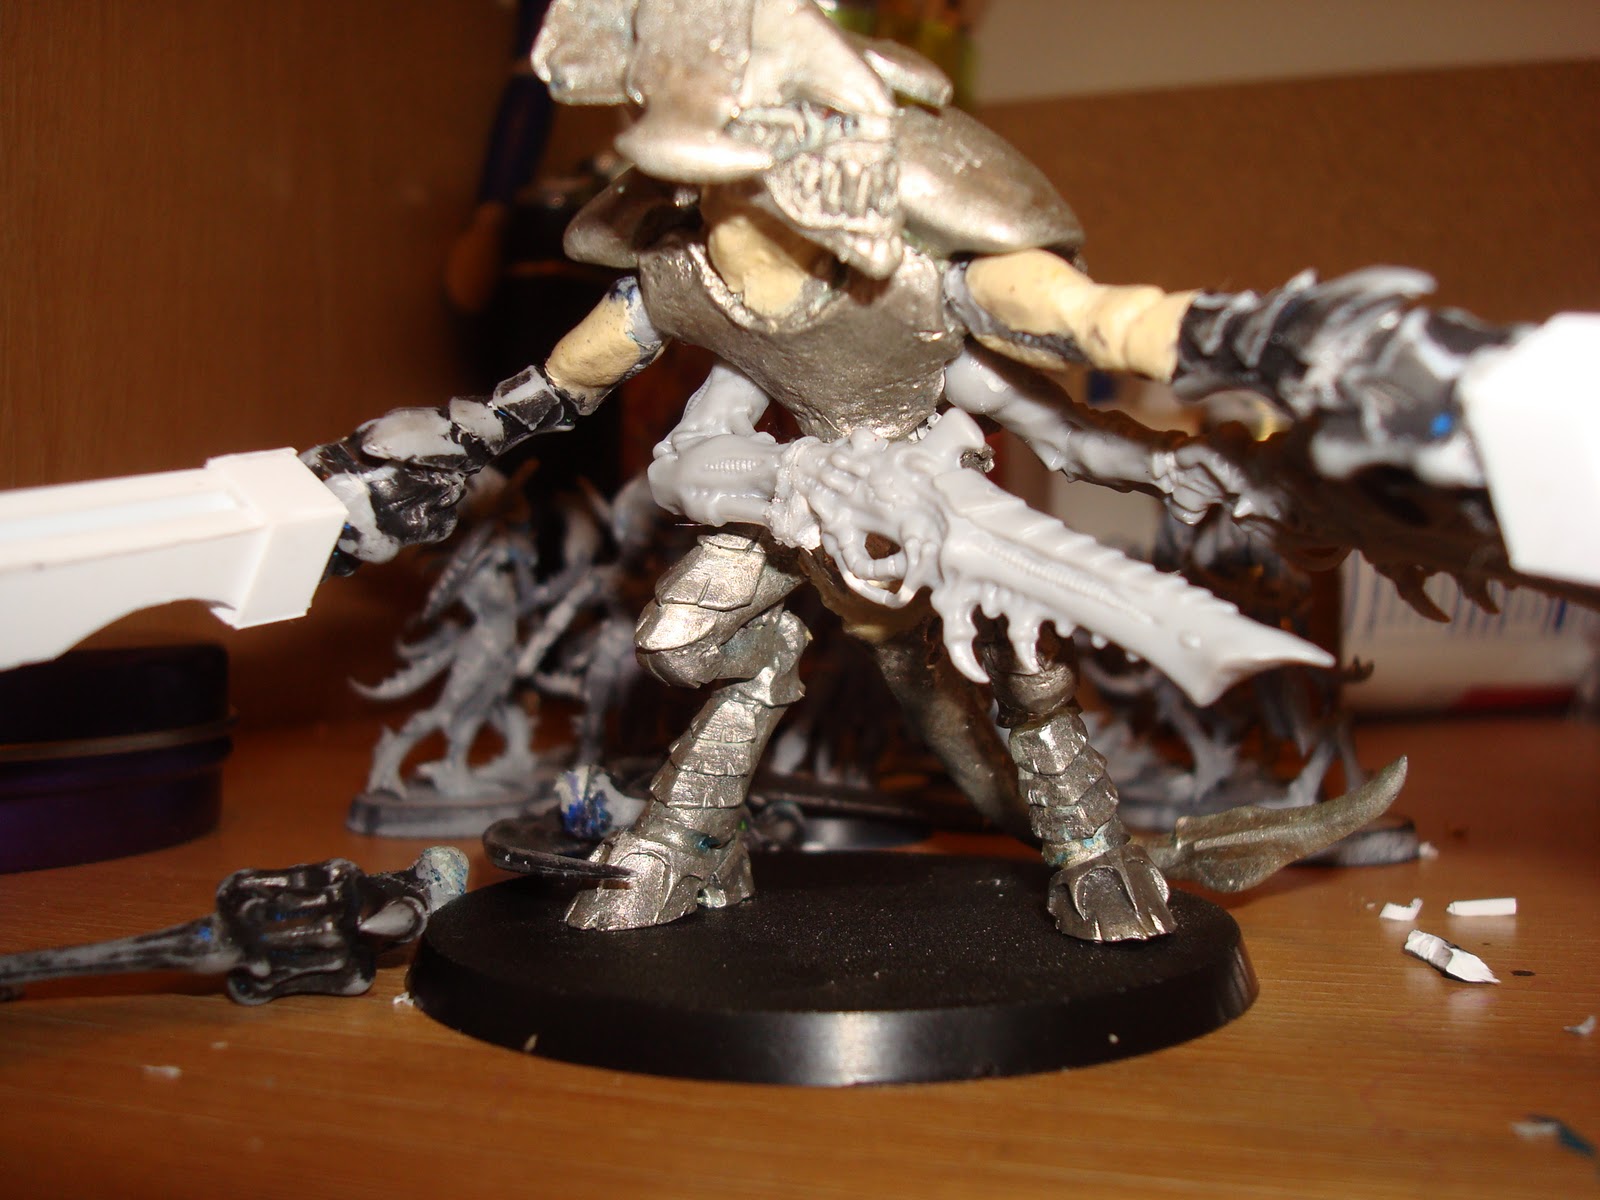
Here's a picture featuring the mostly finished conversion with a regular warrior as a size comparison. Primes are supposed to be the biggest, deadliest Warrior's so I chopped up a couple old Hive Tyrant models to represent them.
The old model is one size bigger than a regular warrior and smaller than the current Hive Tyrant, so it seemed a perfect choice.


I had to beef up his arms to make them muscular enough to carry my "boneswords" and a little putty work to build up a turned neck. He's modeled with "Twin linked" Death spitters, but that is only because I like the "Wild West" look it gives him.
I plan on magnetizing some lash whips to make him a bonesword/lash whip monstrosity.