Showing posts with label Outcasts. Show all posts

7/04/2011

Malifaux- Gremlin Crew w/bases

I finally finished basing my gremlin crew. I have a 2nd Warpig, my custom pig-a-pult, 4 totems, and Pere Ravage to paint up and I'm technically done until August when even more Gremlins come out.

So, without further ado, here we go!

The full set. You can even see the poor casualty in the top right hand corner. The poor guy lost both his arms in a terrible experimental surgery.


Som'er and his crew. I still hate the gremlins holding the guns and absolutely despise Som'er himself. The Slop haulers are great and possibly make up for them.


Ophelia and her family.  I haven't finished Pere just yet, because I want to attempt Object source lighting with his torch and I'm still studying how to do it. These guys were a blast to paint. They all have so much character and charm. Since they were family, I tried to keep them with the same color scheme.


Ophelia was the last gremlin I painted and the 2nd one that I tried to incorporate a theoretical light source. If you look carefully, her clothes, hat, and skin color darken as you get away from her left.
You can't tell because all you can focus on is her breasts and luscious lips. You sick bastard.


Francois was my first attempt at a lighting source. His color changes are much more drastic and noticeable. I like how it looks, but my 2nd attempt is much more subtle. New techniques take time to learn, but I'm too impatient. I want my awesome paint jobs NOW.


   Rami is awesome. He needs a pig counter-balance for his gun. That is awesome. 


 Raphael is my favorite model for the Kin crew. Something about his "bring it on" pose and big grinning grimace looks almost intimidating in that Gremlin-y sort of way.
As a minion, he seems pretty decent on paper. I can't wait to try him out.


LOTS of pigs. I wanted to play a pig heavy gremlin list from the very beginning. Piglets stampeding everywhere and killing friend and foe alike is just hilarious.
Unfortunately I have to touch up their paint job as my matte varnish went slightly foggy on one side of them all.
Don't varnish in 110 degree heat. It'll just cause heartaches.


Can't have Piglets without the gremlins to raise them.  I haven't used these yet, but the Hog Whisperer has some interesting abilities that should make my pigs even more unpredictable.


Taxidermist and his brother, "evil" Taxidermist. They let you buy exploding bacon bombs. That's all I needed to hear before I bought two of them. They have other nice abilities, but the bacon bombs are all I can see right now.


Custom Pig-a-pult. Of course, as I am finishing it up, the official version is about to be released. I originally had it on the 30mm base like it says in the book, but I hear rumors that it will be a 50mm base instead. So I wait till the official version is released.
That is an armorcast special effect cannon blast. It is amazing.
Once I sculpt a bit of "speed lines" around the piclet, I'll be ready to finish painting. This was fun to build.


Fat piglet, why'd you break the bridge? What? No! I'm sorry! Don't explode! *boom*


Massive Warpig that can eat faces. The picture is a lot more glossy than it should be, but you get the idea. This was the first gremlin model I painted up and I think it shows.  I still like it despite it's "age".  :P


Eventual Mosquito bases. The signs came out ok, though I need to paint on "nails". Right now the gremlins have the ability to put wooden signs together without nails!
Should I paint the mozzies standard black or go wild with the rainbow?


Another view and close up. The zombie could be touched up better and I lost count the number of times I rewrote "skeeters ahead"
The direction sign says Mal'foh and badlands. 


Something I learned the hard way while building these and pinning my models down.
Don't glue your models down to their bases, paint them up nice, and proceed to take them off their bases so that you can actually base them properly.
I chipped paint off so many models and had to clean up bits of glue and plastic from way too many tiny feet.
Lesson learned: Make sure to keep the models separate. Slightly bending painted metal results in chipping paint and hours of touch up work.

7/02/2011

Malifaux- Swamp Bases

I've been meaning to take some time and learn how to make some swampish bases based on this tutorial that I found on Terrain Thralls.
If you ever want to learn to make a good swamp base, check that site out. They are amazing.

I also asked my friend over on Grim Dark South for some advice on his Dark Eldar bases. I'm sure if he ever updates that blog of his, you'd be able to see how good his bases are.
Then I spent a good 3 days preparing myself. Having never created bases by hand except for a couple really bad (in hindsight) gravel bases, I was extremely nervous. I would hate to ruin my gremlins by creating monstrosities to pin them on.

It is a lot of pictures so I'll ask for your forgiveness in advance.

 Remember, I followed the tutorial I found pretty much word for word. I'm not going to explain it very much because the author did a much better job than I ever could.
Biggest thing I work on in the beginning was cutting out the water portions and sealing the bottoms with sheet styrene and making sure to glue the rocks down before tossing the sand on top.

 A few of the water sections, space permitting, I tossed in a few bits and pieces I had left over from various sources. Just to spice things up a bit.
The barrel is tossed upside down, like it was spilled in by accident.

Various body parts are chopped up zombie bits from GamesWorkshop.
 Be careful if you cut out portions to create space for water effects. If you don't create a perfect seal and partition off exactly where you want the water to go, it'll either require a lot more than you want to use or it will spill out everywhere.


 For the first base coat of paint, I had to really water down my browns. The sand and rocks had a lot of little crevasses that just didn't seem to want to take in paint.
It took forever to dry and several of them required a second coat.
I'm very very impatient.

 Poor zombies, I never did get to use you like I wanted...Until now! Mwahaha!  The only good zombie is a dismembered and mutilated one.


I painted the bottoms of all my water bases dark green and swirled a little blue to give it some color.  I may have used a bit too much blue and didn't thin out the paint enough. Rather than a swampish feel, it's a bit brighter than I'd like.
Still looks good though. Very pretty.


Most of my finished water bases before any other additions.
I did my best to change up the look and size of the water portions, but there is only so much room on a 30mm base.
They turned out better than I thought they would though.


After about 4 layers of dry brushed browns, from darkest to brightest, I was finally ready to glue the grass on. Note for the future, white glue dries INCREDIBLY slow and if you plan on doing these, don't do them one at a time.
I had a dead brown grass and a lively green one that I mixed together and it creates a much more realistic looking patches. Beware of the fact that the crap gets everywhere and sticks to everything. Don't sneeze!


Close up of the large pig base. I tried to glue grass in small patches and even went "off base" in several of them. It's supposed to give it a larger than life feel, as if it belongs to a bigger picture, rather than confined to a small 30mm piece of plastic.
Does it work? I'm not sure, I'm not the best person to ask, but it still looks good, so it doesn't hurt to do it.


I started adding some tall grass that I got at Hobby Lobby. Woodland scenics makes some great terrain flock, trees, and grasses. For about 4 dollars, I have enough long grass to create a life time of bases. I did up 43 bases and barely touched the amount I bought. Less than 5% is a conservative guess.
The bridges are made from balsa wood and plastic strips. Be careful with balsa wood if you work with it. Very flimsy and doesn't take kindly to having any sort of force applied to it.


When you glue the grass down, watch out, it tends to lean or spread out before you are ready for it.  It takes some getting used to, but you should be able to get it to stablize itself and let it dry without any babysitting.
Cutting the grass is easy, getting it to look naturally grown and not perfectly landscaped is not.


Eventually these are going to be my mosquito bases. I haven't touched them yet as I'm still not sure what to paint them, but the signs should be a good place to pin them.
I just need to remember that Balsa wood is terrible at pinning without being stupidly careful.
I foresee ruined signs and lots of cussing in the future.


I used a Micros Pen to write the words. I tried to paint them on, but I couldn't keep the letters roughly the same size and I kept spacing them too far apart.
This way, my bad handwritting can be passed off as bad gremlin english.


Finally finished them all in about 3 days. I think it was roughly 5 hours a day after work. I'm glad my wife tolerates my bad husbanding as I ignore my family for hours at a time as I obsess over my project.
She's the best.

15 hours of work for 43 bases.  Not too bad I guess. I think I could go faster now, but it would shave off that much time.


I was in a rush to play a game of Malifaux, so I forgot to take a picture of my finished water bases. Here's a base with my 2nd Warpig.
I didn't use modelling water effects, but some cheap stuff I found in the plant display isle at Wal-Mart.
It's basically clear resin that I pre-mix and pour carefully.  It takes up to 48 hours to dry and is extremely cheap. $7 dollars for a massive amount.


The downside is that if you glue any grass where the water will touch as you are pouring it in, it will soak into the grass, pool where you don't want it to be and spill out all over your desk. I had to chip about 10 bases free and refill spots where the resin literally climbed up and out of the base.

See the grass on the bottom? It was meant to be dry. It doesn't look bad, in fact it's great because it gives it a nice wet look that swamp area should have. It was just unintentional and made an impossible to clean up mess.

The total cost of creating all these bases, not including the time required was probably about $25.  I had to buy sand, pebbles, various grasses and the water effects. I didn't even come close to using up any of my materials, so technically if you ignored start up costs, I used pennies worth of materials.


3/09/2011

Malifaux- Piglets

Heh, I didn't realize that before these Gremlins, I hadn't painted a Malifaux model in close to 3 months. Good lord how fast time goes by when work tries to throttle the life out of you.
Luckily for me these little guys were a breeze to paint.
I'm slowly working my way down the list of Gremlins to paint and I'm leaning heavily towards a pig-centric list. Something about bouncing pigs back and throwing the odd explosive swine that just makes me giggle inside.


I followed the same basic steps that I took for the piglets larger kin. Blood red base coat, light black wash to darken the recesses, and highlighted with a brighter red to help make the muscles pop out a bit.
Mane is basically black with a light grey dry brush to help you see the various strands of hair.
Teeth, hooves, and horns are just white with a splash of Gryffon Sepia to make them seem more yellowed and dirty.


The idea of bomb pigs is hilarious. It's the whole reason for a very pig heavy list. I'm not sure how well it's going to work, but it should be a fun game at the very least.
Painted the dynamite sticks an orange with yellow stripes at the tips to help them be more noticeable against the dark red skin. I love the classic ACME bombs and everything, I just wish they would have created new models rather than reusing the classic piglets with bombs modeled on top.


This was going to say BOOM but I greatly underestimated how hard it is to paint words that are less than a millimeter high.
I think I may be getting better at painting wood. At least I did a better job with the highlights on the boxes than I usually do.


It may be hard to see, but I attempted painting fire for the first time on the lit fuse. It is very similar to trying to paint lava.
I made the mistake of painting the fire in reverse and starred at it for nearly 15 min before I realized why it looked so bizarre. I knew I had the correct colors down before I realized that the order it was in showed the fire starting from the top going down into the fuse.

2/25/2011

Malifaux- Gremlin Crew

Woo, sorry for the lack of new content. Lots of new life situations popped up and hobby time = zero. Sacrificing sleep for an hour here and there was really the best I could do to sneak in some painting time.

I finally managed to finish painting up the Som'er crew that I won as a prize from The Gamer's Lounge ages ago.
Living in Arkansas for a few years gave me plenty of time to see what a real redneck looks like. Denim is everywhere along with worn out leather jackets, stained wife beater t-shirts, and lots of guns.
The Gremlins are PERFECT.


I decided to go with a brighter green rather than the usual dark orcish green I see everywhere. I seem to paint lots of dark colors and with the Gremlins I had a chance to go for a brighter, sillier scheme.
To break up all the green, I gave them all yellowish liver spots. The spots are actually very small, barely noticeable from three feet away, but up close, they help give some character to the crew.


I really dislike the Som'er model. The face just doesn't do anything for me. Once the hats and guns pack arrives from Wyrd, I may attempt to convert a regular gremlin into one carrying a massive rifle and wearing a giant hat, one that is obviously too big for his tiny head.
I need to work on wood grain effects and changing up leather. They are coming way too similar for my tastes.


I had so much fun painting up the crew that I went ahead and bought pretty much the remaining models to complete my collection. I need 2 more Giant Mosquitoes, the Pig-a-pult model when it is finally released, and possibly another Giant Warpig.
I did my best to model the generic gremlins into different poses or holding different gear, but I can only do so much with solid metal sculpts.
Anyone have ideas for the 3 gremlins holding the rifle in the shooting position? I hate the pose and the fact I have 4 of them irritates me.

11/30/2010

Malifaux- Ronin

This'll be a quick post as I still haven't gotten to play a game with these lovely ladies yet. Despite the errata, the ronin still look great on paper. I can't wait to mess around with them.

I experimented with yellow as the main color as I've never done the color before and wanted to see how it would turn out.
I hate this color. It's horribly bright, sickly, and altogether hideous.


It's fairly obvious that I don't know what to do with yellow as the wash turned out pretty bad.
I'm happy with her pants and of course all that practice with other Outcasts made me pretty good at leather.
Once I figure out how to paint filigree on the edge of clothing, the other 2 ronin will join this one on the completed shelf.

11/28/2010

Malifaux- KillJoy


Feh, don't you just hate how real life invades, conquers, and destroys your precious hobby time at the worst opportune moments?

I'm going to miss that painting streak I had going. :)

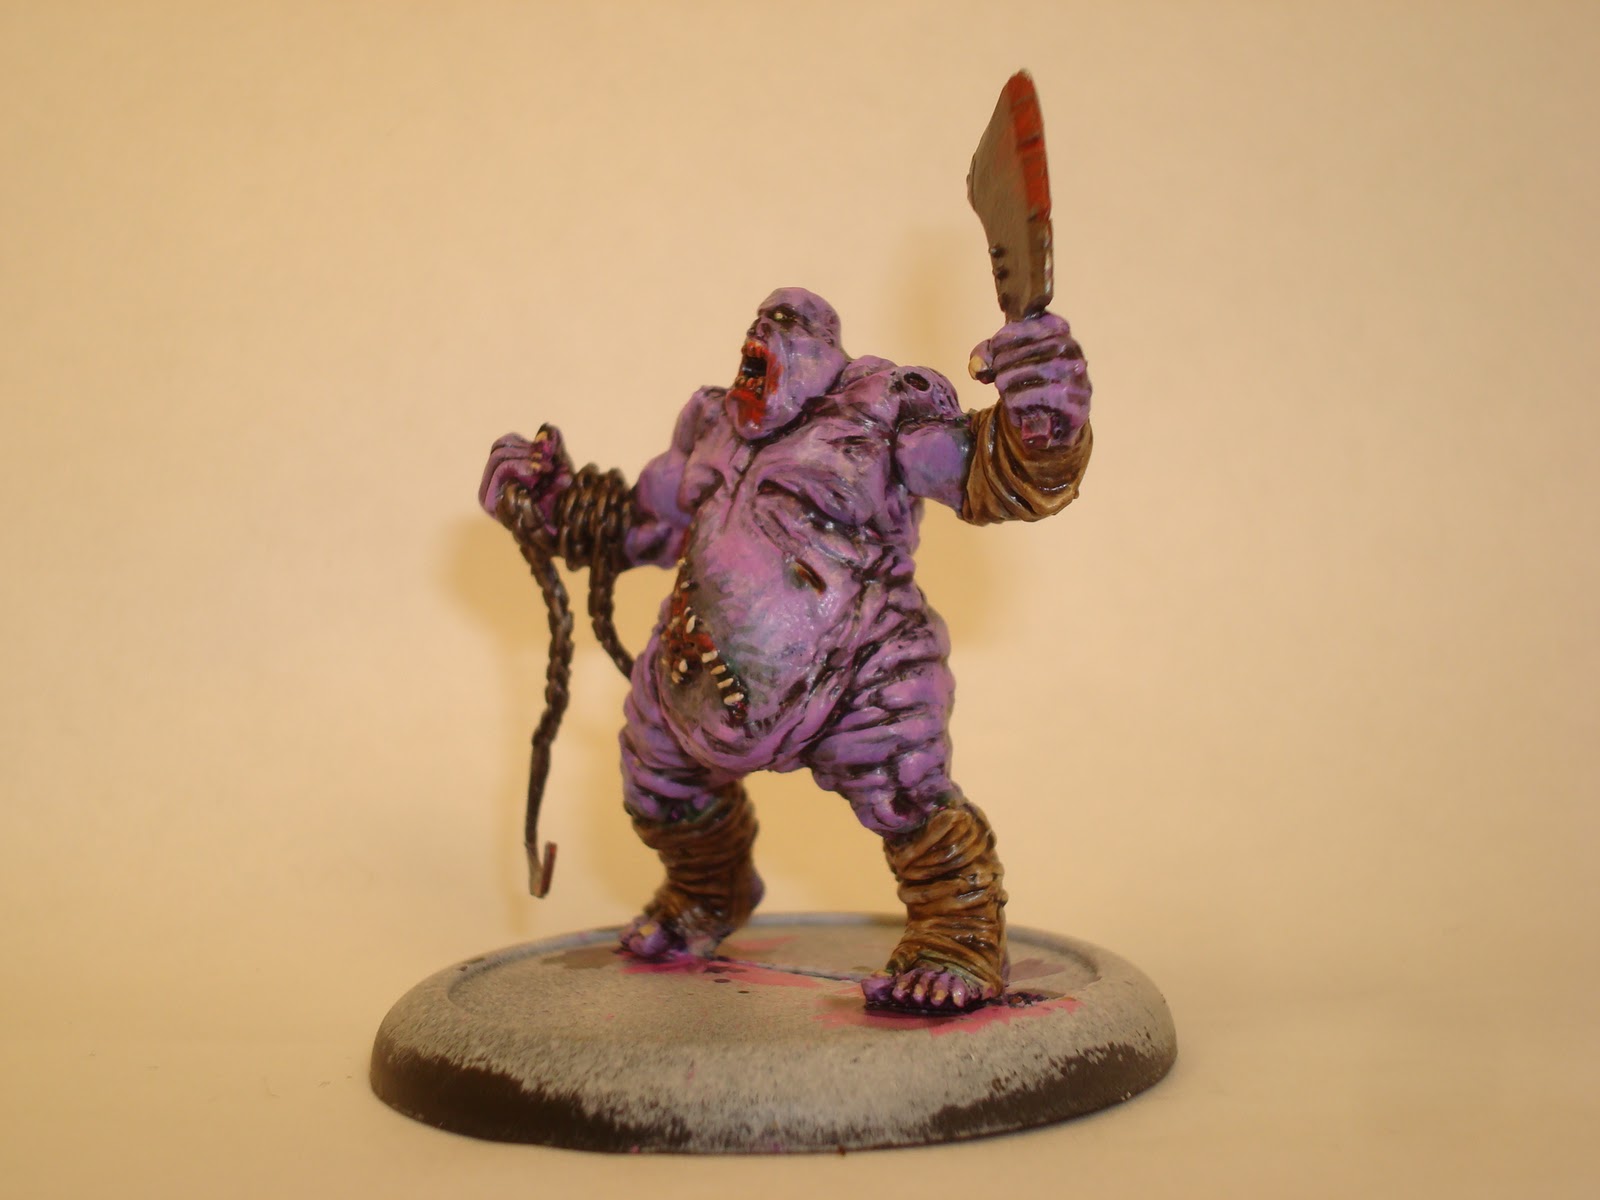
Anyway, Killjoy is one of the few Outcast models I needed to really complete my set from Book 1.  I'm not a big fan of the whole rotting fat zombie look he has going, but I am a big fan out all the rotting bodies he theoretically will leave in his wake.
I say theoretical because I haven't actually run a game with him yet.

I went with the purple/pink color scheme because I really wanted to emphasize Killjoy's neverborn origins rather than focus too much on the undead aspect that a lot of other people seem to focus on. Pale flesh, rotting green, etc just seemed too played out.
I really had a lot of fun messing with the washes and trying out different combinations to create different color effects.
It's hard to see in the pics, but there are quite a few places where the washes sort of fade together, which is as close to blending as I'm going to get.

The biggest complaint I have about the model is that his chain is really REALLY flimsy. It's on the verge of snapping off at the hook and I'm not too sure what I'm going to do once that does happen.
I sorta sped through the bandages as they really bored me. Bleached bone, black and sepia wash and slight highlights to make each wrap "pop" out. Considering the speed I did them, they turned out pretty decent.

10/02/2010

Malifaux- Ronin and Kill Joy WIP

Not really a Work In Progress but mainly showing off what my wife got for our 1st year anniversary. She knows what I want, need, and like, so basically what I'm saying is I have the perfect wife.

I can't wait to paint them. The ronin are some of the best models I think Wyrd Miniatures produces, Killjoy is horrifically disgusting in the best way possible, and all of them are utter beasts in the game.

While I've been running the Outcasts without Ronin so far, everything I've read says that I've been doing it wrong. Looking forward to running a couple of them a few times to see what I've been missing.


Killjoy is mainly there because the idea of a nigh unkillable monster running rampant through the encounter, eating everyone in sight makes me giggle a little on the inside. Everyone, including my crew.

With these on hand, minus the totems, I do believe I have every Vic related Outcast currently out in production. While I'm looking forward to the Special Forces and Book 2 mercenaries, my wallet will be happy to have a short rest.


edit 9/30/10: Apparently I don't know how to schedule this for another day. Dur! Look, you can glimpse into the future!