I've been meaning to take some time and learn how to make some swampish bases based on this tutorial that I found on Terrain Thralls.
If you ever want to learn to make a good swamp base, check that site out. They are amazing.
I also asked my friend over on Grim Dark South for some advice on his Dark Eldar bases. I'm sure if he ever updates that blog of his, you'd be able to see how good his bases are.
Then I spent a good 3 days preparing myself. Having never created bases by hand except for a couple really bad (in hindsight) gravel bases, I was extremely nervous. I would hate to ruin my gremlins by creating monstrosities to pin them on.
It is a lot of pictures so I'll ask for your forgiveness in advance.
Remember, I followed the tutorial I found pretty much word for word. I'm not going to explain it very much because the author did a much better job than I ever could.
Biggest thing I work on in the beginning was cutting out the water portions and sealing the bottoms with sheet styrene and making sure to glue the rocks down before tossing the sand on top.
A few of the water sections, space permitting, I tossed in a few bits and pieces I had left over from various sources. Just to spice things up a bit.
The barrel is tossed upside down, like it was spilled in by accident.
Various body parts are chopped up zombie bits from GamesWorkshop.
Be careful if you cut out portions to create space for water effects. If you don't create a perfect seal and partition off exactly where you want the water to go, it'll either require a lot more than you want to use or it will spill out everywhere.
For the first base coat of paint, I had to really water down my browns. The sand and rocks had a lot of little crevasses that just didn't seem to want to take in paint.
It took forever to dry and several of them required a second coat.
I'm very very impatient.
Poor zombies, I never did get to use you like I wanted...Until now! Mwahaha! The only good zombie is a dismembered and mutilated one.
I painted the bottoms of all my water bases dark green and swirled a little blue to give it some color. I may have used a bit too much blue and didn't thin out the paint enough. Rather than a swampish feel, it's a bit brighter than I'd like.
Still looks good though. Very pretty.
Most of my finished water bases before any other additions.
I did my best to change up the look and size of the water portions, but there is only so much room on a 30mm base.
They turned out better than I thought they would though.
After about 4 layers of dry brushed browns, from darkest to brightest, I was finally ready to glue the grass on. Note for the future, white glue dries INCREDIBLY slow and if you plan on doing these, don't do them one at a time.
I had a dead brown grass and a lively green one that I mixed together and it creates a much more realistic looking patches. Beware of the fact that the crap gets everywhere and sticks to everything. Don't sneeze!
Close up of the large pig base. I tried to glue grass in small patches and even went "off base" in several of them. It's supposed to give it a larger than life feel, as if it belongs to a bigger picture, rather than confined to a small 30mm piece of plastic.
Does it work? I'm not sure, I'm not the best person to ask, but it still looks good, so it doesn't hurt to do it.
I started adding some tall grass that I got at Hobby Lobby. Woodland scenics makes some great terrain flock, trees, and grasses. For about 4 dollars, I have enough long grass to create a life time of bases. I did up 43 bases and barely touched the amount I bought. Less than 5% is a conservative guess.
The bridges are made from balsa wood and plastic strips. Be careful with balsa wood if you work with it. Very flimsy and doesn't take kindly to having any sort of force applied to it.
When you glue the grass down, watch out, it tends to lean or spread out before you are ready for it. It takes some getting used to, but you should be able to get it to stablize itself and let it dry without any babysitting.
Cutting the grass is easy, getting it to look naturally grown and not perfectly landscaped is not.
Eventually these are going to be my mosquito bases. I haven't touched them yet as I'm still not sure what to paint them, but the signs should be a good place to pin them.
I just need to remember that Balsa wood is terrible at pinning without being stupidly careful.
I foresee ruined signs and lots of cussing in the future.
I used a Micros Pen to write the words. I tried to paint them on, but I couldn't keep the letters roughly the same size and I kept spacing them too far apart.
This way, my bad handwritting can be passed off as bad gremlin english.
Finally finished them all in about 3 days. I think it was roughly 5 hours a day after work. I'm glad my wife tolerates my bad husbanding as I ignore my family for hours at a time as I obsess over my project.
She's the best.
15 hours of work for 43 bases. Not too bad I guess. I think I could go faster now, but it would shave off that much time.
I was in a rush to play a game of Malifaux, so I forgot to take a picture of my finished water bases. Here's a base with my 2nd Warpig.
I didn't use modelling water effects, but some cheap stuff I found in the plant display isle at Wal-Mart.
It's basically clear resin that I pre-mix and pour carefully. It takes up to 48 hours to dry and is extremely cheap. $7 dollars for a massive amount.
The downside is that if you glue any grass where the water will touch as you are pouring it in, it will soak into the grass, pool where you don't want it to be and spill out all over your desk. I had to chip about 10 bases free and refill spots where the resin literally climbed up and out of the base.
See the grass on the bottom? It was meant to be dry. It doesn't look bad, in fact it's great because it gives it a nice wet look that swamp area should have. It was just unintentional and made an impossible to clean up mess.
The total cost of creating all these bases, not including the time required was probably about $25. I had to buy sand, pebbles, various grasses and the water effects. I didn't even come close to using up any of my materials, so technically if you ignored start up costs, I used pennies worth of materials.
Showing posts with label Conversions. Show all posts
7/02/2011
1/22/2011
WH 40k- Tyranids- Warrior Prime
I wish I had enough time in the day to spend time with all my hobbies. These last few weeks, rather than completing one of my many projects, I've been spending every non-working minute playing Persona 4.
Luckily for me, I've finally completed the game, which only took me 70+ hours of game time. BTW, amazing game. Check it out. It's worth it.
Now that I've taken care of that particular hobby time killer, I've been messing around trying to finish converting my Warrior Prime. The goal of my Tyranid army is to have a primarily Warrior based/evolved force. This means Warrior Primes as the HQ, Warriors as the troops, Shrikes/Ravenors as fast attacks and a brood of Lictors tossed in for the elites.
Of course having nothing but warrior based bugs won't help me trash vehicles so eventually I plan on throwing in Zoanthropes, hiveguard, Trygons, or Tyrannofexes. It may not be the most competitive army, but I'm hoping it'll look freaking awesome.
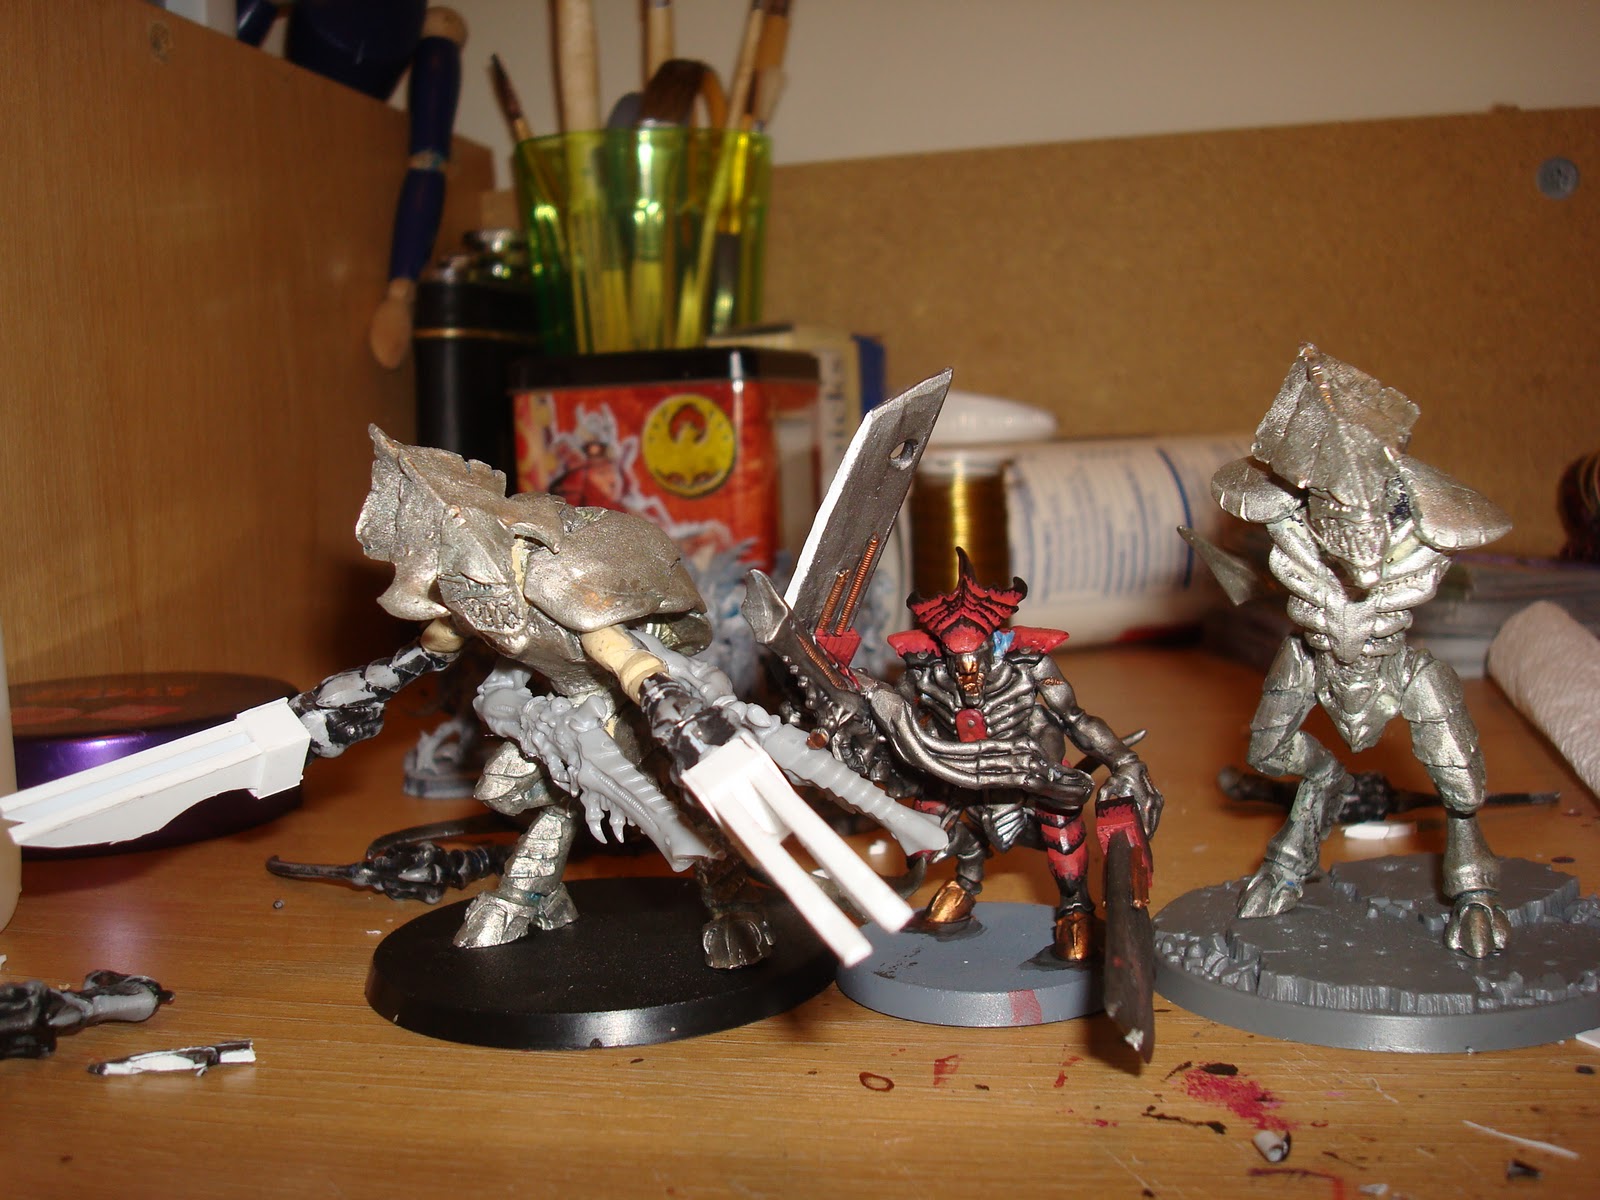
Here's a picture featuring the mostly finished conversion with a regular warrior as a size comparison. Primes are supposed to be the biggest, deadliest Warrior's so I chopped up a couple old Hive Tyrant models to represent them.
The old model is one size bigger than a regular warrior and smaller than the current Hive Tyrant, so it seemed a perfect choice.
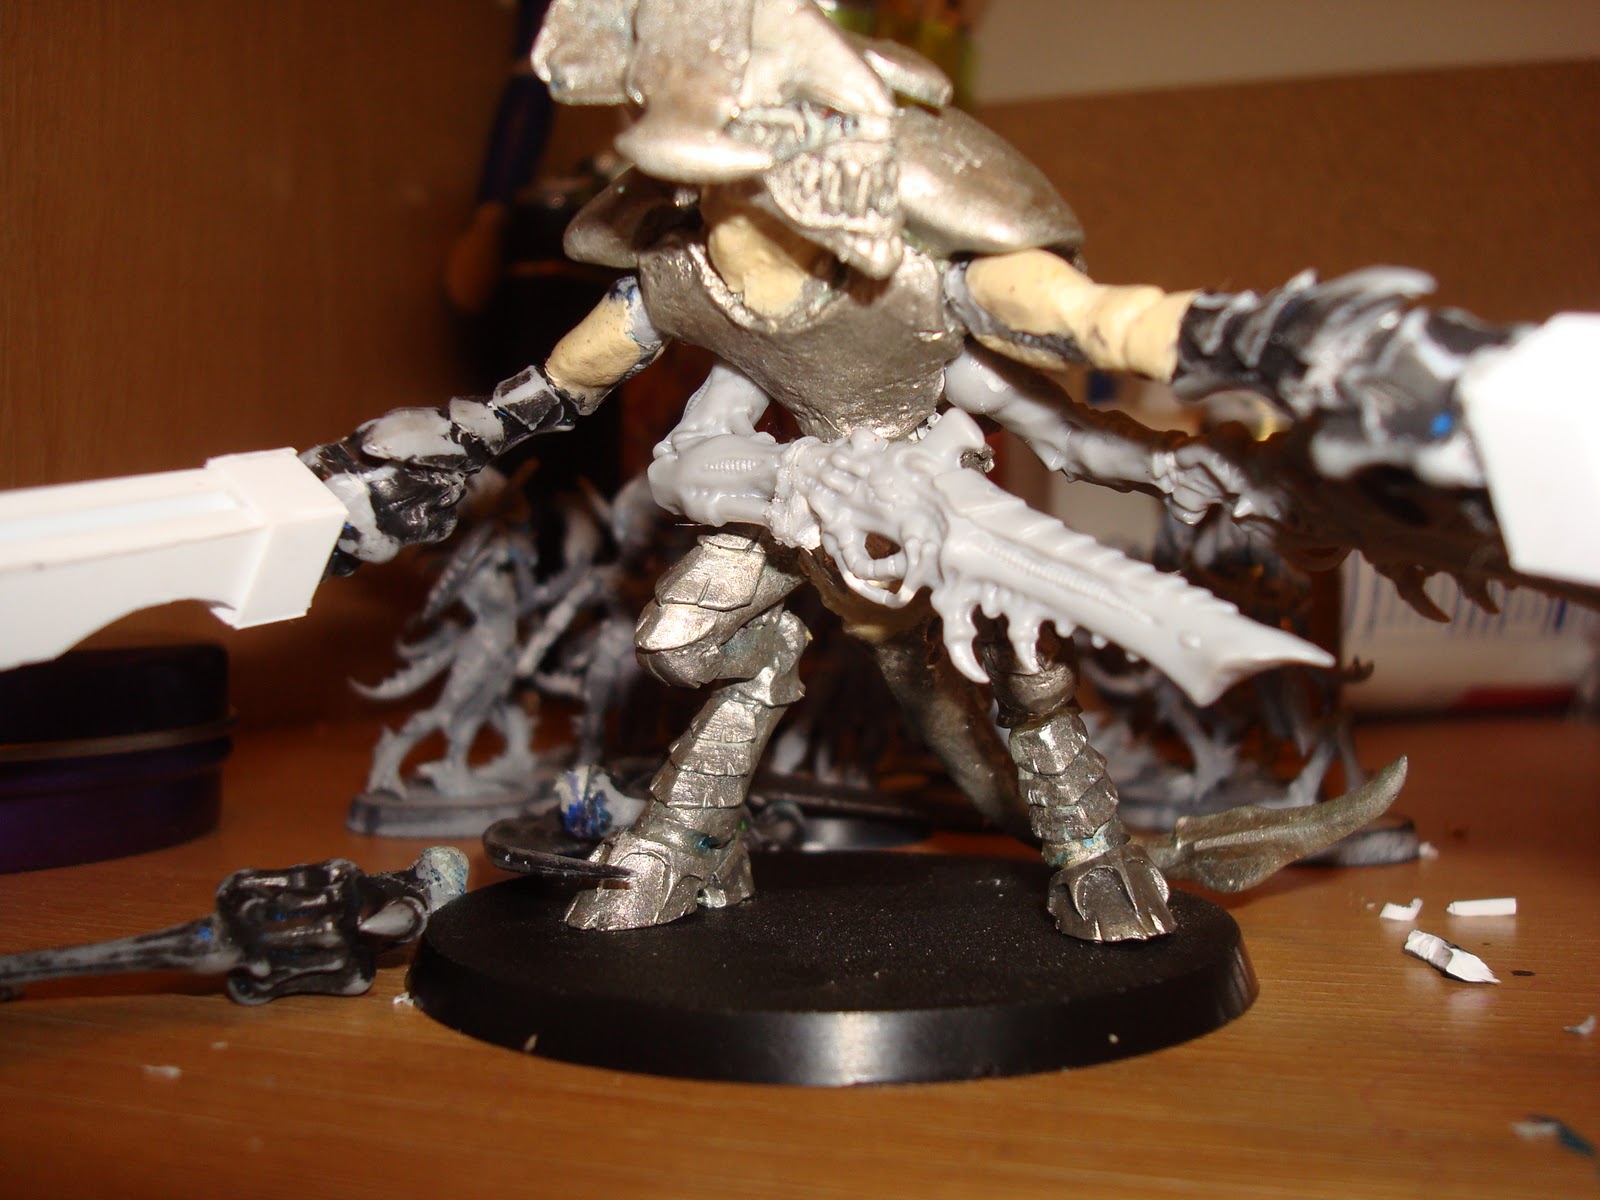
I had to beef up his arms to make them muscular enough to carry my "boneswords" and a little putty work to build up a turned neck. He's modeled with "Twin linked" Death spitters, but that is only because I like the "Wild West" look it gives him.
I plan on magnetizing some lash whips to make him a bonesword/lash whip monstrosity.
Luckily for me, I've finally completed the game, which only took me 70+ hours of game time. BTW, amazing game. Check it out. It's worth it.
Now that I've taken care of that particular hobby time killer, I've been messing around trying to finish converting my Warrior Prime. The goal of my Tyranid army is to have a primarily Warrior based/evolved force. This means Warrior Primes as the HQ, Warriors as the troops, Shrikes/Ravenors as fast attacks and a brood of Lictors tossed in for the elites.
Of course having nothing but warrior based bugs won't help me trash vehicles so eventually I plan on throwing in Zoanthropes, hiveguard, Trygons, or Tyrannofexes. It may not be the most competitive army, but I'm hoping it'll look freaking awesome.
Here's a picture featuring the mostly finished conversion with a regular warrior as a size comparison. Primes are supposed to be the biggest, deadliest Warrior's so I chopped up a couple old Hive Tyrant models to represent them.
The old model is one size bigger than a regular warrior and smaller than the current Hive Tyrant, so it seemed a perfect choice.
I had to beef up his arms to make them muscular enough to carry my "boneswords" and a little putty work to build up a turned neck. He's modeled with "Twin linked" Death spitters, but that is only because I like the "Wild West" look it gives him.
I plan on magnetizing some lash whips to make him a bonesword/lash whip monstrosity.
12/12/2010
WH 40k- Chaos Daemons - Bloodthirster? Keeper of Secrets?
After three months without a day off and no real time to work on anything, I started to get frustrated. Besides the joy I get out of it, painting also provides me with an outlet for all the irritation I build up managing my employees and dealing with irrational customers.
I knew it was past time to work on something when little irritations seemed major problems, so I pulled out an Ultraforge model I had been tinkering around with for the past year, sat down and pretty much finished it...6 hours later.
I'm actually rather proud of this model.
If you haven't checked out Ultraforge you really need to do yourself a favor and look at some of their sculpts. They are cheap for their size, all resin, and amazingly detailed. I had picked up the Tree Woman as I felt it would make a good alternative to Games Workshops Keeper of Secrets. The official model is hideous. Slaanesh is supposed to be the Dark God of excess, desire etc. He's the only evil God to look beautiful. So beautiful he can entrall any mortal with a glance.
Why then does his greatest minions look like a cross between a man, woman, crab, horse thing?
Starting off, I chopped off all the extra tree limbs and branches that were...branching out from her body. Then I started smoothing out all the jagged cuts I left behind and removing the small amount of flash that was left on the model.
I wasn't sure if this was going to be a Keeper of Secrets to start with or a Bloodthirster, so I ventured into the world of magnets for the first time.
I drilled out a couple holes in the shoulder blades to place some demonic wings I had on hand along with a spot in each arm.
The model came with alternative hands that are holding wooden knives? Eventually I want to model her holding gigantic axes rather than knives so I went ahead and magnetized them all.
This was also the first real time I worked with modelling putty to fill in holes and work in some extra details. Sadly I tore up big chucks of the model as I tried to fit in my magnets for the first time. The holes were too big. Detail was lost. The dremel missed it's mark. I'm not sure if those are common first time mistakes, but all 3 hit me at once. On a large expensive model at that.
To fix my mistakes, I had to learn how to use putty quickly. If you want to do a decent job at molding putty with very little effort, get some shaping tools. They are cheap and they helped a newbie fix some pretty nasty mistakes.
You can't even tell where my mistakes or magnets are, that's how easy they were to work with.
Hmm...you can see in this picture that one of my magnets didn't lie completely flush with the arm. I'll have to go back and fix that at a later date.
I started off painting her the same as all my previous Khorne daemons using purple/pink as the main color. It was going great until I finished the base coat and it was pink. Overwhelmingly pink. PINK.
It really was nauseating how much there was on the poor model.
The pale flesh tone at random intervals ended up looking much better than expected at breaking up all the pink. It's vaguely sexy while creepy at the same time.
I had a blast using the GW washes on the model, in case you couldn't tell from looking at it.
Sepia shaded the flesh while red and black shaded the pink.
Slight highlights to brighten the edges of her "skin" and she was pretty much done.
I stuck her on an extra Trygon base since nothing else came close to her size. She is a big girl.
She looked so lonely though on that large base, so I had to add something to spruce it up.
I was going to add a few casualties to the base, body parts littered around, but it didn't seem very cinematic.
Not sure where I got the idea of having the Greater Daemon rescue a lesser Daemonette, but it looks good.
I modeled the Daemonette to look as if she was kicking away the Marine in an attempt to escape. Her claw is trying to shear the boltgun in half and her mouth is screaming in rage and fear.
The Marine doesn't have a care in the world. He's knocked the Daemon down, has her pinned under his foot and boltgun and chainsword ready to eradicate her evil from the galaxy.
Too bad he didn't look behind himself or notice the pentagram seared into the dusty landscape.
First attempt at a "lava" effect which really needs more rocks and large flat areas to be effective. The little raised portion of the ballast/sand really aren't tall enough or large enough to give it the fiery brimstone look I was going for.
I may have also been a little heavy handed with the yellow in an attempt to show a glowing light.
Over all this may be one of the best models I've painted to date. It's definitely showing much improvement over my other Daemon models and I started work on those barely a year ago.
If this keeps up, I may be getting ready for more advanced painting techniques like blending or Non metallic metals. Woo!
12/09/2010
WH 40k- Chaos Daemons - Bloodcrushers
Bloodcrushers were the first model from the Daemon codex that really excited me to attempt to convert. While I absolutely loved the real Bloodcrusher model, I couldn't see myself trying to pay for several $50 dollar metal models and then trying to make each one look different from everyone else's models.
Luckily for me, as I was complaining loudly to my wife about my terrible, terrible problem, I chanced upon a sale that Miniaturemarket was having on old Rackham: Confrontation minis.
Each one was going for $10, used the same base size, and looked freaking amazing! It was a gift from the Chaos Gods themselves!
I painted them up using the same color scheme as my Bloodletters, adding in a great deal of copper and brass to give it a Khorne feel. Excessive violence and murder eventually turn my bloodletters into a massive, mindless version of themselves so they have to be chained and led into battle. Luckily my Bloodletters don't seem to mind the change.
More bright blue to help them fit in with the Bloodletters, but you can really tell I painted them onto a back that has no little bumps. I should have gone and sculpted little bumps all over like their lesser kin have.
The shadowing from the washes turned out better on these larger models and helped tone down the brass, but I'm not sure I toned the silver down enough it feels too clean for my tastes right now. Maybe I'll go back and dirty them up a bit.
The biggest complaint I've gotten for these models at Dakka Dakka was that the poses were way too similar, something I agreed with.
So, I went back, tore several of the arms off and repositioned them so that they looked slightly different.
The change to the arms helped, but they really are in the same pose and have their head cocked in the same exact angle. Not sure what I can do about that as these models aren't exactly pose-able.
12/05/2010
WH 40k- Chaos Daemons - Bloodletters
I've been listening to a bunch of podcasts lately and the one I've been enjoying a great deal the last few days has been The 11th Company. One of the main hosts actually plays the army and I enjoy listening to his tactics and list ideas. The more they talk about how random, erratic yet effective the Daemon's are, the more I've been wanting to paint them.
The Fluff for my army is still in the working stage, but it basically goes along the lines of Slaanesh slowly stealing away Khorne's minions away from him with the promise of an excess amount of warfare, bloodshed, and violence to keep them happy. This would inevitably make Khorne weaker and Slaanesh stronger.
Unfortunately Slaanesh under estimated the sheer violent nature of Khorne's daemons and instead of minions fully under his control, they have become a mixture of the two God's natures, creating sleeker, more deviant variations.
Since I don't have a working camera right now, you'll have to make due with the few models I actually have pictures of. Starting off are my Bloodletters of Slaanesh.
Using scything talons from my leftover Tyranid sprues, I replaced about half of the sword arms, sometimes replacing both arms.
I tried to show that they were slowly growing "Daemonette" rending claws and Daemonette arms were way too skinny to use as replacements.
The skin tone turned out a nice, bright, purplish pink hue that I've grown to love. Not quite the pink of Slaanesh and definitely not the red that Khorne favors. The bright ice blue was a nice easy way to keep the pink from overwhelming the models.
These were the first real models I experimented washes with. While they look pretty decent, I think I could do a much better job now with what I've learned the last year or so.
Sadly, I'm really not sure exactly what steps I took to get them to look exactly like this, so all newer models I paint up will look very similar, yet not quite right.
I've only got about 16 or so of these guys painted as I want the Khorne part of my force to be the minority. Bloodletters, Bloodcrushers, and a Bloodthirster will be pretty much all I'm bringing. I'm hoping to make them about 33% of my 1850 army.
7/04/2010
WH 40k - Space Marines
I want to start the post off by saying this at the very beginning. I do not like Space Marines. At all.
I'm not really sure why I don't like them. I think it may have more to do with the fact that EVERYONE plays Space Marines and it's obvious that GW gives more love to the Space Marine chapter than any other army.
To be honest, I wasn't going to start a SM army, because of those reasons. I ignored every post I saw about them. Even to the point where I didn't know all the units/stats of the most played army in 40k history. The only thing I really noticed about the entire SM line of models was the Techmarine and Dreadnought, both of which are my favorite models.
Then I heard about the Dreadzilla list. A list where most of your army is put into Dreadnoughts and it's being led by a super Techmarine. It could be made even better by adding in Vulkan Hestan, a special character that pretty much is another super Techmarine. That's when the urge to build this army grew.
These are so amazingly detailed, that I'm shocked that none of the pieces broke off as I handled them. These terrible pictures really don't do them justice. You have to see them to understand how well they add to my army.
The whole urge to create the army was for the dreadnoughts. I decided to go with nothing but ironclads. The idea of a a bunch of robots rushing forward to tear shit up with their bare hands made me constantly smile.
4 of them are based off the Assault on Black Reach dreadnought with some forgeworld arms, 1 is a real Ironclad, and 1 is a converted regular dreadnought I got somewhere that didn't have any arms with it. Out of them all, the actual Ironclad is the one I hate the most. I added little detail bits to spice up the looks, and I'm really happy with the Imperial Guard one.
Leading the army is the Master of the Forge. This guy was a beast to paint. So many little details, that it felt overwhelming. I didn't know where to start, and I'm horrible at painting weapons, let alone Power Weapons. Still not sure how I like what I did with him. He's also the first guy I tried "weathering" on. It turned out well enough that I did it to the whole army, but I'm sure I could do much much better.
While cleaning this model of mold lines, I managed to slip and slice apart his poor hand. I was upset for a little bit when I realized that he'd be GLAD to get rid of those weak sausage fingers and happy to replace it with a smoke launcher! Now he gets a cover save all the time! Not really, but it doesn't look too horribly on him.
Purity seal guy, he's sort of a religious nut. He knows that troops are among the first units to die horrible deaths and firmly believes that the Emperor will save his life as long as he believes strongly enough.
Purity Seals=Faith=Belief, thus Belief=safety
So he shoved as many as he could find onto his body and so far I think it's working. The Emperor truly does love him.
Subscribe to:
Posts (Atom)